
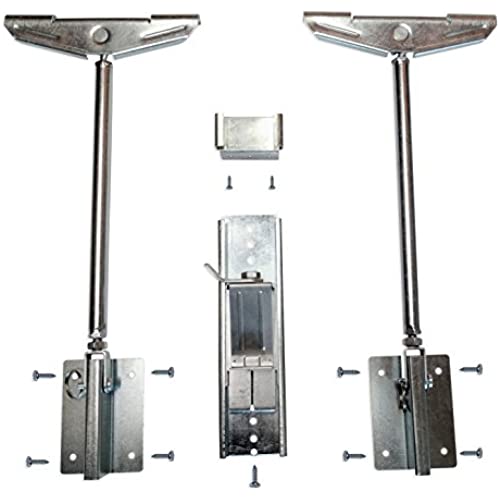

Never Fall Complete Sink Repair system
-

Frank C.
> 24 hourIf youre handy, this repair system will save you a lot of money. Can someone answer me why everyones sink is attached to the granite with worthless glue guaranteed to separate? I cant believe how widespread this issue is. My sink started separating from the granite and a repair guy quoted me over $300 to stabilize it in place. I watched a YouTube video instead and one of the comments recommended this repair system. I had very little room on one side of the sink but still managed to get the arm in there for support. Installation of the middle support was quite easy. The most challenging part for me was cleaning the old silicone and reapplying it. Anyways, for this repair kit and clear silicone, job done for less than $50.
-
Jonny Barger
> 24 hourTo start, I am not the most handy person in the world but anywhere I can save a few $$$ I do my best. Instead of spending hundreds of dollars to have somebody reattach my under sink when it separated from my granite counter top I started looking into ways to do it myself. I came across these brackets and gave them a shot. So far I am extremely satisfied and it has been a week since installation. I went a little overboard and installed 4 brackets under my kitchen sink but 2 would do just fine. I am very happy with the quality of the product and the easy to follow videos the company has online to install. The one area for improvement would be the written directions which come with the brackets. They are a little outdated and the pictures are not very clear. Aside from that, I 100% recommend trying these brackets.
-
Fedupintx
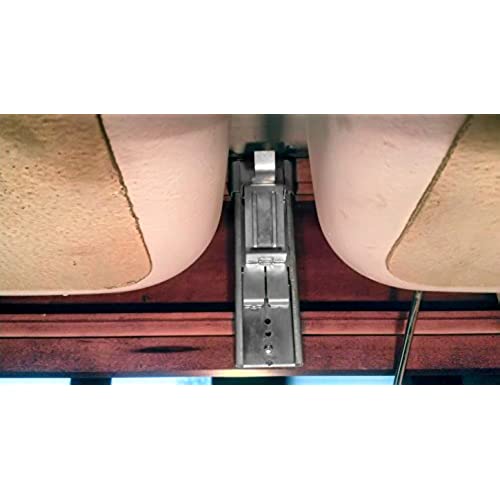
> 24 hourI really liked this product for the way I used it. My undermount stainless steel sink detached from the granite countertop as it had not been originally installed with any kind of clips or brackets to help hold it up, only the silicone adhesive/caulk. I was completely worried about trying to find a granite fabricator to drill and install clips when I found this product. Although the instructions discuss using this to lift the sink into place, I did not try to use it for the actual installation. I just did not see a good way to get the sink almost in place and still have enough room to lay the caulk bead before raising it all the way to mount it. So I used a board spanning the sink cut out above, with bar clamps placed in the drain holes to pull the sink up. This gave a slightly uneven pull since the drains were off center toward the back, so I used a small (bottle) car jack underneath to lift up the sink and caulk it into place. Once the sink was secured with the clamps and jack and it appeared to be exactly where I wanted it, I installed the Never Fail brackets to lock it in place. I had room to get one side done while the caulk was drying, but since the jack was in the way, I just waited to get the other side done the following day after the caulk had set. No big deal since the clamps and jack were keeping it in place. The long side brackets were super easy to install and reached well below the bottom of my sink so I had plenty of room to drive the screws without the sink being in the way. I would recommend you install the bracket for the small front slide lock before you put the sink in place. I managed to put it in, but it took some tricky, off center placement and a ratcheting right angle screwdriver. For how I used it, this was just the ticket....
-
Prof. Elmer Goldner
> 24 hourIm FAR from a handy man and I was able to get this installed correctly. Super-simple and genius product, really appreciate this as it made my life much easier! Would highly recommend it!
-
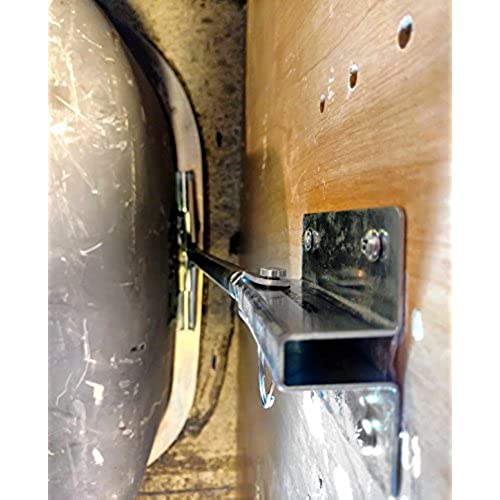
Daniel E. Walter
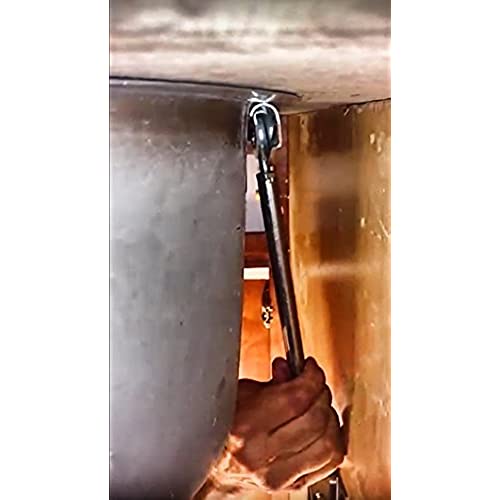
> 24 hourMy double kitchen undermount sink was starting to come apart from the counter in the middle. Also the caulking was looking very bad and discolored. So after reading lots of reviews I decided on this product and a tube of silicone caulk. The installation was very simple since the back of the plate that you screw into the cabinet was sticky so it allowed you to place in on the wall in the exact place you wanted before drilling holes into the cabinet and attaching it to the wall. Then once attached it was very easy to tighten the arm to press the sink up tight against the bottom of the counter and squeeze the newly installed caulk to make a secure fit.
-
Rick Salve
> 24 hourMy sink collapsed from the weight of a bowl of water!? Didn’t know that was possible. Suspended by epoxy resin from the granite countertop, I was actually shocked that it didn’t happen sooner once I saw what was holding it up: essentially a couple beads of epoxy resin. Following my tradition of overstructuring anything I DIY, I installed 2 on each side of the sink. That also provided me the maximum flexibility of being able to support the sink from asymmetric points. Otherwise, I would have take all of the plumbing out, including the garbage disposal and the water filtering system, just to get a clean access. If you are like me, and would rather lift everything as the video describes, your biggest challenge will be to drill the supporting screws before tightening the turnbuckles and restoring all of the sink and hookups to its prior position. BTW, that actually works. I was skeptical. For that reason the adhesive backing feature is a God send, since it supports the brackets before you can get the screws in. Get it level as possible once you stick it into position. As far as screwing the brackets to the side of the cabinet walls, one should use a flexible drill bit. There just isn’t any room under there. Despite the flexible drill bit, I still had to install half of screws blind or by feel. To that end, I recommend drilling pilot holes first, then the screws. It’s so much easier since drilling at bend will reduce the force you can apply. If you’re unsure where to put the brackets, just tighten the turnbuckle when you open the package just to see what the maximum lift distance is, and you’ll get a feel for what you have to work with. Account for the fact that brackets will support the sink at angles. The turnbuckle only will give you about 3 inches or so to lift the sink. Position the sink first. To achieve this, I just propped the sink up with a bucket and a couple pieces of wood from the bottom of the garbage disposal until about a 2-3 inch clearance existed between the bottom of the countertop and the top of the sink. Attaching the brackets with the screws is the most time consuming part, otherwise everything went as planned or as the video shows. The next most time-consuming part is removing the previous calk to create new clean surface to calk. Calk and then lift the sink as evenly as possible by turning each of turnbuckles counterclockwise until the sink and it’s attachments are back into position. Weird as it seems, the plumbing will actually help, since it “wants” to be in its previous position. Given these caveats, the product works great and is an improvement over what was there. I’m pretty sure I can stand in the sink if it we’re not for fear of denting the stainless steel.
-
EricEFNY
> 24 hourThe sturdiest installation hardware for new or replacement sinks in the kitchen or bathroom. No drilling into ceramic, marble or any type of countertop. Mounts to the side wall of of the base cabinet. Less obstruction of the cabinet storage space as opposed to those mounted to the bottom of the cabinet. Easy installation...great product!
-
tyura
> 24 hourThis is a case of a skeptical purchase that turned into a super pleasant surprise. I had an undermount stainless sink that started to fail, separating from the granite countertop. Came across this product which claims to address that very problem. I’m mechanically inclined and can fix most things, so didn’t think I needed this...but ordered it as a fallback option. I opened the box when it arrived and was blown away by the quality of the design and the components. Instructions were ok, kind of made sense, but couldn’t really envision how it would look assembled. So I watched their instructional video. It then all made perfect sense. Put the brackets in - two in back, one in the front, approximately 30 mins for all, including silicone sealant between the counter and sink. Worked perfectly. Very happy with the results - just like new again. Can’t say enough to do this justice...it’s a simple fix to an ugly problem, great quality too. Kind of a shame that it’s hidden from view! If you have the same issue, you won’t be disappointed.
-
Keyon Bayer
> 24 hourAlways worried about the sink falling down at just the wrong time. This kit removes that worry at a very reasonable price.
-
Jeff Gierczak
> 24 hourI had to install a new garbage disposal when I discovered our kitchen sink was loose and sagging. The guy who installed it did it inproperly. Luckily, I stumbled upon this product after reading of different ways to reattach a sink. I ordered and received the product in a days time via Amazon. Having watched the install video, I had my sink back up within 30 minutes. Anyone can use this product to install their sink.
