
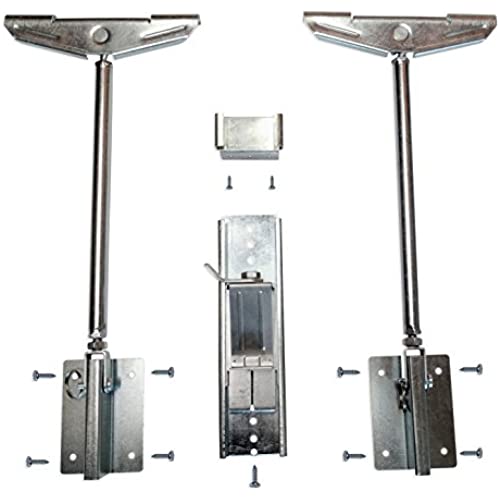

Never Fall Complete Sink Repair system
-

Beverly Billions
Greater than one weekSo easy to do and works like a miracle. Installed this in 10 minutes and I am not a good handy person. Solved a problem that no one else would, including plumber and granite company. Pure genius.
-
Joe I.
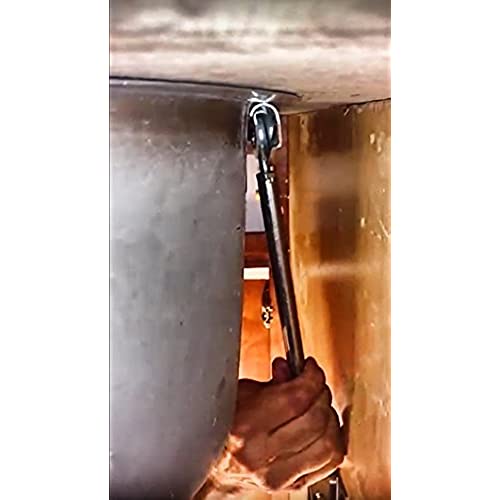
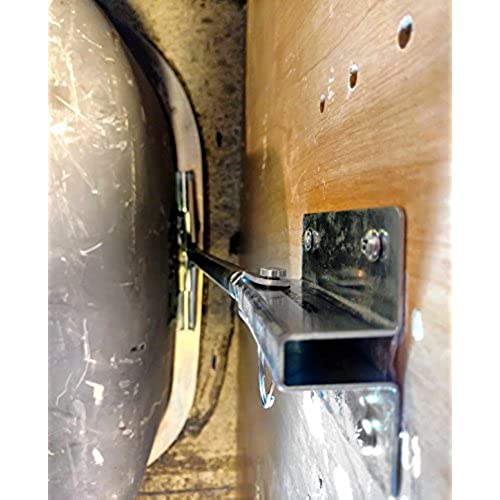
Greater than one weekAfter fifteen years the epoxy brackets on the rear of the sink started letting go. Nearly impossible to replace them without removing all the plumbing including the disposal. Bought a set of these and in less than an hour from start to finish I was done. I first cleaned and replaced the sealant around the sink then propped it up using a 20 or so 1×6 to protect the cabinet base from getting damaged. I then used a small bottle jack with a T made out of a 2×4 and then propped up the sink. I immediately cleaned up the sealant before attaching the brackets. Propping the sink also keeps you from having to extend the brackets more than 1/2 or so keeping it from any sort of bending. I did a quick placement off each bracket and drew two rough lines. I removed the bracket from the turnbuckle and drew my lines making sure they were plumb. I then attached the bracket to the cabinet wall and the adhesive backing made it a breeze to predrill my screw holes. I then reattached the turnbuckle. Turned it roughly 4 or 5 turns till snug and tightened up the lockup. Even though my front brackets seemed fine I used the front mounting bracket and that was even easier to install. Very satisfied.
-
Pepin Torres
> 3 dayI had a sink fall (from a granite countertop) when the brackets gave out. I had one person come in to fix it twice, and twice it fell (originally, he charged me $300 which was reimbursed after much complaining on my part). Two more contractors basically told me there is nothing they could do about it and refused to come in to check it out. I then went to the web and found this product. WORKS AS ADVERTISED. It takes less than 30 minutes to install and the installation process is made real easy with the adhesive tape (I do recommend you watch the YouTube video). The only tricky part is applying the recommended clear silicone sealant but is you practice your caulking skills on something else before committing to the sink, youll be fine. Do follow the instructions about hand tightening - dont be tempted to use a wrench. I had no need for the optional front bracket but saved it just in case. If you have a fallen sink, get this. Youll get a permanent solution at a fraction of the cost.
-
LRH
09-04-2025Brilliant idea, easy to install. I had to buy two small jacks to raise the undermounted sink, but the whole repair was done in a few hours. Youtube videos also helped me find this solution.
-
C.G.
Greater than one weekI have quartz countertops and an undercounter stainless sink. It fell about 1.5 because it apparently was only held in(all this time!) with nothing but adhesive. The plumbing was fine so I decided to try this. I bought a small tube of silicon adhesive too. I cleaned the sink rim, scraping out any gunk and getting it as clean as possible. Before I put the adhesive I also wiped down the rim with alcohol. After watching the Youtube video and reviewing the instructions, I installed the brackets quickly. Put the adhesive on and then tighten the brackets. Do one more coat of adhesive around the edge of the sink to make sure you dont have gaps. Seriously easier than you think!
-
J. Busse
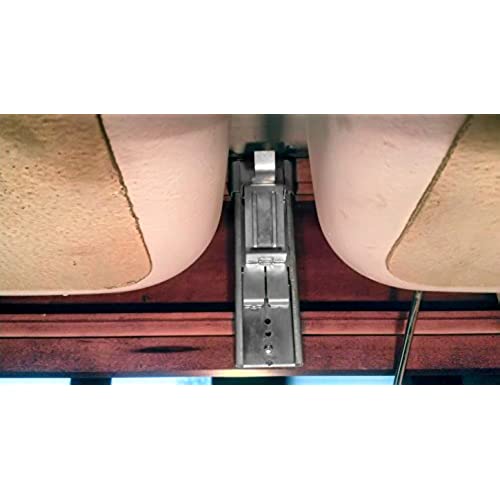
> 3 dayStarted the install at 7:15 and was complete with a new no clog drain assembly by 8:00. I did not use the front bracket. It might have been faster with 2 people. I used a chisel to remove the old glue that had hardened. That took most of the time. There is about one inch of adjustment in the extension so I just dry fit everything and marked the cabinet walls about 1/4 - 1/2 inch below where the shortest distance of the extension landed. I did take out the pin and extension first and stuck only the bracket to the wall using the double sided tape so all that weight wasnt hanging on the glue. I was able to drill the pilot holes, that I think are very important, with a 90 degree drill. I could not fit my electric driver under the sink so I had to use a 90 degree ratcheting phillips to drive the screws. Needless to say, it is important to have the tools on hand and plan well. Then I put the sink on a stack of pots, put some sealant around the lip and installed these brackets. Then I hand turned the extensions slowly as the sink squeezed out the excess gunk. Turn wait, Wait Turn Turn Wait... etc. Done with the install. I did take the opportunity to install one of the no clog stopper assembly available on Amazon or the local hardware store. It works great too. Even though this is fairly expensive compared to clips I think it is well worth the money. It is darn near fool proof, is very strong, and easy to install.
-
danno
> 3 dayWe woke up to our bathroom undermount sink falling because the contractors who put them together didnt install any clips under the marble. I was able to use the never fall system to essentially jack the sink back into place - and its sturdy. However, stripping out the old silicone and recaulking really should be done, and is not an easy task. Anyway, this system did what I needed it to do.
-
Nina S Los
> 3 dayMy wide double undermount sink, held up by TWO (2) clips total (!!) glued to the granite, one on either side, was sagging badly in the middle. This would have been the second time I needed to replace the separating caulk in 2 years. So instead I ripped out the old caulk, put one of these babies at the back and front to support the middle, and slapped some more silicone in the now perfectly even gap! ^_^ It does what it says!! Due to an extra bit of 2x4 or maybe 1x4 (idk, do I sound like I know what Im talking about?) inside my sink cabinet, probably the Y2K custom carpentry contractor special, I wasnt able to use the cute little ratchet support. But never fear, one of the long boys works just as well and is practically invisible unless you stick your head into the cabinet. Thanks for replenishing my faith in humanity and myself with this awesomely sturdy product!! Now to figure out what to do with the remaining brackets (can I send em back to you?) -A New Fan
-
Ferg
> 3 dayThis product did what it needed to do to repair a bad installation by a licensed contractor. I installed it myself with absolutely no issues. It says it can support over 600 lbs and I believe it. Cant believe that the contractor didnt use something similar to this. But as long as their poor installation lasts until the warranty expires, they are happy.
-
Handy Mike
> 3 dayI do many detached kitchen sink repairs and Ive used 5 different versions of under-mount brackets. So far, these are the fastest ones to install. Because the wide mounts do the job of 2 narrow ones, it saves time and effort. The ratcheting clamp for the front is genius and worked great. You will want a long extension for your driver, and the smallest (narrowest) drill/driver you have to drive the screws in the gap between a double bowl sink. If you have a single bowl sink, I dont think youll be able to install it. There is plenty of adjustment room on them, so if your sink has a gap, youll be able to mount the brackets first, then push the sink back up into place. Slight cons: -It would be nice if the turnbuckles were hexagons so you could fit a wrench on them. But I just used pliers and it worked great. -It would be really great if they could incorporate a spring into the extension that pushed the bracket arm inwards toward the sink. When the gap between the sink and the side of the cabinet is small, you have to hold the bracket against the sink when you tighten it to keep it in place or it can fall over and away from the sink flange. It can be difficult to have 2 hands up in place under many cabinets. -It would be awesome if self-drilling screws were included in the package. I usually replace the included screws with self-drillers because they go in much easier.
