
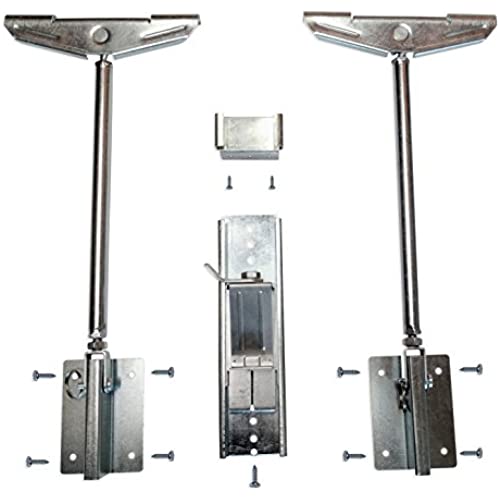

Never Fall Complete Sink Repair system
-

Michael
> 3 dayWe have an under-counter stainless sink with granite countertops. Our builder used some kind of cardboard and glue tabs to hold the sink on. Well, that lasted about 5 years. This worked perfectly to lift up the sink back in place. Install: it was not hard but a little messy and time consuming for the home DIYer. Once you remove the sink you need to really clean up the sink top and under-counter area. I did this with a scraper and steel wool. Installing the hardware was simple a few measurements and fit checks were all it took. You do want a partner in this endeavor to help hold and align the sink with the counter. There are a few good YouTube videos showing installation.
-
Jonny Barger
> 3 dayTo start, I am not the most handy person in the world but anywhere I can save a few $$$ I do my best. Instead of spending hundreds of dollars to have somebody reattach my under sink when it separated from my granite counter top I started looking into ways to do it myself. I came across these brackets and gave them a shot. So far I am extremely satisfied and it has been a week since installation. I went a little overboard and installed 4 brackets under my kitchen sink but 2 would do just fine. I am very happy with the quality of the product and the easy to follow videos the company has online to install. The one area for improvement would be the written directions which come with the brackets. They are a little outdated and the pictures are not very clear. Aside from that, I 100% recommend trying these brackets.
-
sifuchar
> 3 dayI used this product to repair my mother’s under-mount kitchen sink, which had fallen. It not only added support, but made the entire job much easier. I measured and installed the anchors with the support rods about 5 turns extended. This gave me just the right amount of room when I added the support rods to back off and allow a gap to add some silicone adhesive. Rotated the rods to hold it firmly against the counter, tightened the locking nut, and done. Feels very solid, even before the adhesive dries. Would definitely use again or recommend. UPDATE: 1 year later, sink is still firmly in place. :)
-
JessEE
> 3 dayWorks as expected. Install this if youRE using undermount sink and stop worrying when your spouse use cast iron dutch oven or any HEAVY DUTY TOOLS :)
-
Chadwick Smith
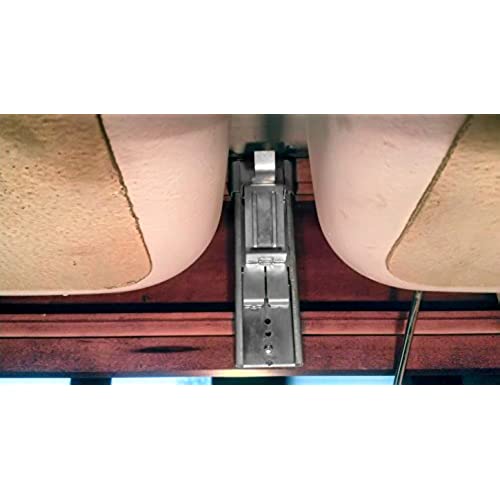
Greater than one weekFor a DIYer, this is essential. It allowed me to lower the sink so I could scrape and clean away all the old gunk. Then it made installing it up to counter height very easy. For a one-man DIY job, this is worth EVERY penny. For that matter, I bet pros would use it too, as some reviewers stated. I did have to disconnect the elbow joints to give it more freedom to move up and down. Didnt want to risk cracking these old pipes. Also, having 3 supports works fine: the two rods on the side, and the front-under-counter doohickey. I installed using the 2 rods. Afterward, I added the front support. I also ended up putting a 1x2 in the back to provide a 4th point of support. It doesnt get in the way, so why not? But I wouldnt say it is necessary. This kit provides everything you need.
-
MPRUETT
Greater than one weekOur stainless steel sink had separated from the underside of the granite countertops on one side, and I tried the Never Fall system, and it worked exactly as advertised. I was honestly a bit surprised that it worked as well as it did, and that it was as easy as it was. I highly recommend it! You will need a small level though; it says you want to get the screw-in brackets vertical or itll cause problems.
-
David Upton
> 3 dayThis product works as advertised. The glued brackets under the granite counter supporting the sink failed and I didnt want to risk any drilling into the stone or hiring an expert. This product was the best solution to my problem and worked great!
-
laura
> 3 dayOur kitchen sink fell in a few weeks ago because the gent who owned our house before us used industrial glue instead of the normal bracket kit. We bought this as a hail Mary since none of the hardware stores had what we needed. And it more than did the job!
-
Chad
12-04-2025This product is well-made, sturdy, and easy to install. It comes with good printed instructions and there are also videos. I am surprised something like this isnt stocked in local hardware stores. I cant think of anything bad to say about it. Note to fellow Canadian buyers: I found it more cost-effective to order directly from the manufacturer here on Amazon.com, instead of from the resellers on Amazon.ca. YMMV
-
Rick Salve
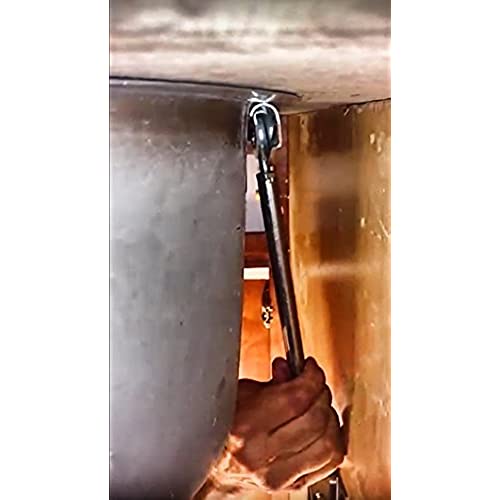
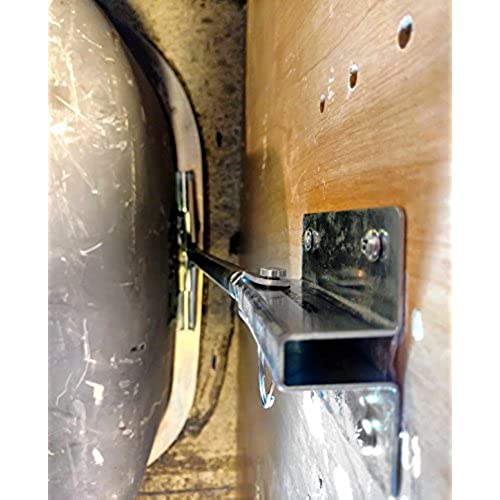
09-04-2025My sink collapsed from the weight of a bowl of water!? Didn’t know that was possible. Suspended by epoxy resin from the granite countertop, I was actually shocked that it didn’t happen sooner once I saw what was holding it up: essentially a couple beads of epoxy resin. Following my tradition of overstructuring anything I DIY, I installed 2 on each side of the sink. That also provided me the maximum flexibility of being able to support the sink from asymmetric points. Otherwise, I would have take all of the plumbing out, including the garbage disposal and the water filtering system, just to get a clean access. If you are like me, and would rather lift everything as the video describes, your biggest challenge will be to drill the supporting screws before tightening the turnbuckles and restoring all of the sink and hookups to its prior position. BTW, that actually works. I was skeptical. For that reason the adhesive backing feature is a God send, since it supports the brackets before you can get the screws in. Get it level as possible once you stick it into position. As far as screwing the brackets to the side of the cabinet walls, one should use a flexible drill bit. There just isn’t any room under there. Despite the flexible drill bit, I still had to install half of screws blind or by feel. To that end, I recommend drilling pilot holes first, then the screws. It’s so much easier since drilling at bend will reduce the force you can apply. If you’re unsure where to put the brackets, just tighten the turnbuckle when you open the package just to see what the maximum lift distance is, and you’ll get a feel for what you have to work with. Account for the fact that brackets will support the sink at angles. The turnbuckle only will give you about 3 inches or so to lift the sink. Position the sink first. To achieve this, I just propped the sink up with a bucket and a couple pieces of wood from the bottom of the garbage disposal until about a 2-3 inch clearance existed between the bottom of the countertop and the top of the sink. Attaching the brackets with the screws is the most time consuming part, otherwise everything went as planned or as the video shows. The next most time-consuming part is removing the previous calk to create new clean surface to calk. Calk and then lift the sink as evenly as possible by turning each of turnbuckles counterclockwise until the sink and it’s attachments are back into position. Weird as it seems, the plumbing will actually help, since it “wants” to be in its previous position. Given these caveats, the product works great and is an improvement over what was there. I’m pretty sure I can stand in the sink if it we’re not for fear of denting the stainless steel.
