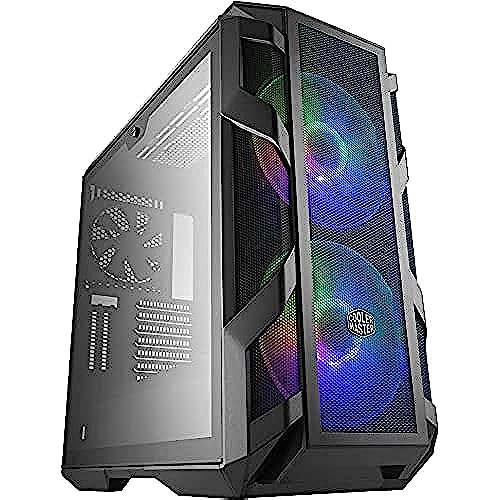


Cooler Master MasterCase H500M ARGB Airflow ATX Mid-Tower with Quad Tempered Glass Panels, Dual 200mm Customizable ARGB Lighting Fans, Type-C I/O Panel, and Vertical GPU Slots (MCM-H500M-IHNN-S00)
-

Mike
> 3 dayMy core reason for purchasing the H500M was to improve my airflow situation. I was previously using a Deep Silence 3, a case that was focused more on reducing noise than cooling. I didnt add any additional fans or coolers to the H500M Happy to report that it was a success. My 3800x idle temp went from 45°C - 60°C down to 35°C to 45°C. Gaming temp dropped from 75°C - 85°C down to 55°C to 65°C. Thats just using the stock Wraith for cooling in both setups. I also saw a 7°C drop on my Sabrent NVMe drive when idle & a 10°C drop when gaming. The only thing that didnt change much was my 970 GPU. it does have a 5°C lower idle, likely due to lower overall case temps. At full load, its still hitting 75°C to 80°C, same as before. But the good news is that temps of the other parts are staying low when the GPU is at full load.. Overall, the build was pretty simple. The entire swap took about 45 minutes, much of which was cable management. I may end up adding an AIO or more fans at the top of the case, but Im pretty happy with the results thus far.
-
KatexLx88
> 3 dayLots of room easy to work with and beautiful case for sexy build for gaming/work and make great content working on fitting in with a 2nd pc in side with 50tb or room for editing and steaming.
-
A. Wilmath
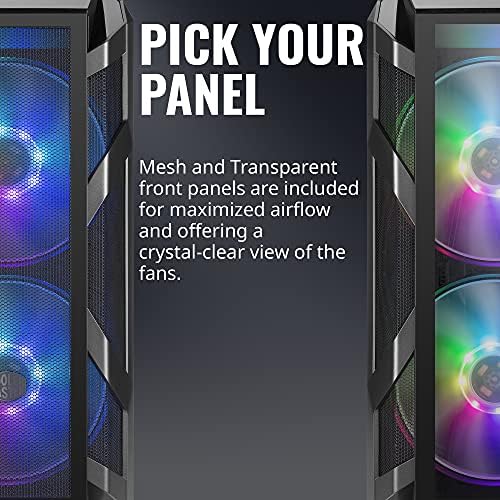
> 3 dayThis is a good case, even better when you consider the price. The image I induced is with an additional single strip of RGB lights attached along the top of case on the glass side of the top fan mounts. If it were perfect, I would like the top magnetic filter to be a smooth piece of plastic to cover the top to aide forcing the air out the back, but its a only a 100-120 dollar case. I would like it to have ARGB fans in the front, again it is only a 100-120 dollar case. I would like a nicer latching system than the system used to hold the glass side panel on, again its a 100-120 dollar case. The rear fan is not ARGB or RGB, again it is a 100-120 dollar case. All of complaints are really things that would make it perfect for me and are unreasonable for case at this price. Many of those things are features of the more expensive version. This case even comes with the an option clear acrylic front panel! This is case was nice to build in, cable management was very easy. You would really need to intentionally make mess of your wires to have a rats nest with this case. I can name a half dozen nitpicks, but that is what they are. Im really impressed because there are more expensive cases that are not this nice. This is legitimately a nice case that cools well with the included fans. The included fans are quiet and move a decent amount of air. Things that may be useful to know. The included RGB controller was not connected when the case arrived and I did not use it. The included controller connect to a SATA power cable and has a place for connecting the reset or power switch for changing modes. It is tiny and uses standardized connections so Im going to use it in an older computer. I connected the included fans to my Gigabyte Z370 Gaming motherboard using the 12v 5pin RGB header using an adapter cable and a 4 pin fan header for the spinning part. The motherboard fully controls the fans. To do this you will need a cable that goes between the Gigabyte style header and the stanardardized 4pin RGB that fans use. The cables for the spinning function of the fans is industry standard and even comes with a splitter already connected. I configured the motherboard to use voltage control to ramp the fans up and down. The power supply shroud comes out with only a single thumbscrew, there are also two sets of hols to mount the power supply either way. In my build the only drive is NVMe on the motherboard so the PS shroud going all the way would have been nicer I think, but the 2x3.5 HD cages comes out with a single thumbscrew. There are plenty of places for zip ties and moderate room behind the motherboard. The magnetic filter for the top is, functional. Its not substantial enough and so looks goofy since it is wavy and not a smooth even surface as a result of a thin piece of plastic with a magnetic frame. With the fans in the front blowing in there should not be dust entering from the top anyway. I had an issue with what sounded like coil whine, it was from running the back case fan too slow and it sitting there rocking, so I had to change my custom fan settings and now it spins all the time, it is pretty quiet anyway. Some positives are that the PS shroud is so easy that you can easily remove it to work on the headers at the bottom of the motherboard. There is good room at the top for working with headers by the CPU power header. So to sum it together, it is a good airflow case with nice looks and uses industry standard conoectors for the fans so you can connect to your motherboard or third party controllers if you want. That is a big bonus because my friend who bought smaller and less expensive case is looking at replacing his included fans because they dont have standard connectors and so run at full speed all the time, which means he will end up spending more money than I did. I really like there is nothing goofy or weird, its all industry standard.
-
Ning chen
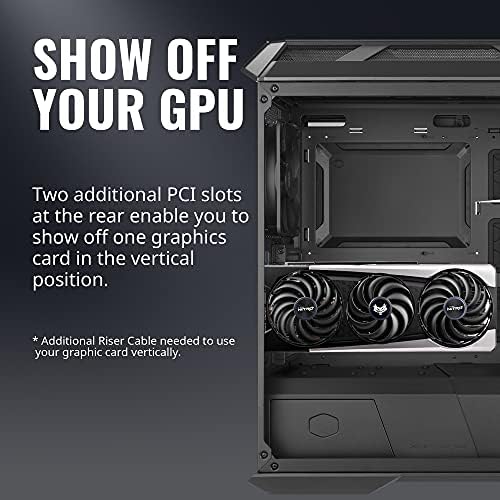
> 3 daySo ...I custom build a Mid- High range gaming desktop with this case , first top quality for sure ! 99% metal and glass Constructed , awesome design with many ways for customizability that all you need from a mid tower , this is a bigger size mid tower which what I looked for , removed the Sata storage parts , since I got 980 pro M.2 , and it was blocking the airflow of the front lower fan , now more room & airflow ! I also added the universal raiser rack now can see the look of this 6900 XT i think this is what it designed to look like ? Considering will add the LED near -GPU , now is like a beauty hiding in dark ! ,very fast WiFi adaptor . I love this case sure it worth the price ! Specially when you got nice hardwares , the out-look should be stunning for sure
-
Rwarcards762
> 3 dayI built my first full gaming rig in this case a year ago. Maintenance is easy-- the filtered intakes mean I dont need to worry about dust. The clear side panel means I get to enjoy my build every time I sit at my desk. The included 2x200mm RGB fans work great and look good as well -- theyre practically silent as well. I replaced the rear 120mm fan with an RGB-enabled one later on, but for the time I used it, it gave no issues and pushed plenty of air. Overall, as far as airflow goes, this case is a CHAMP. The minor flaw-- to clean the front intake, you must remove BOTH side panels and undo plastic clips. It would be much more convenient if there was a release lever or something on the bottom which would allow the front to slide off... however this is minor as you really shouldnt need to do this too often. Overall this was great to build in, comes with great included fans, has great airflow, and doesnt break the bank. Will always recommend this case to people.
-
salam fenjan
> 3 dayThis case quality is 100% and will fit any every brand motherboard or power supply the weight is about 23 kg and the collers the curves the style man am telling you in real life is way better then you see it in youtube . Get it and thank me later
-
Rhamnetin
Greater than one weekI chose this case based on Linus and TechPowerUps reviews because I dislike the process of building PCs and just want a case that makes it as easy as possible, considering my E-ATX motherboard and tendency to use 360mm AIOs (and possibly AIO cooled GPUs in the future). My case before this was the Lian-Li PC-O11D XL, and this absolutely dwarfs it. Pros: + Cable management GOAT - the motherboard area bulges in towards the left side panel, creating a lot more space behind it. In terms of cable management its by far the easiest build I have ever done. + Fits E-ATX motherboards without sacrificing cable management + Excellent airflow out of the box - 2x 200mm front intakes, 2x 120mm rear exhausts, also a disconnected 120mm bottom intake which you shouldnt use because its a sleeve bearing fan which means it wont last long mounted horizontally down there + Bottom fans/radiators install onto a bracket, so that you can install them outside the case. Top fans/radiators can also be installed outside the case by removing that part of the top panel (a structural component though). + Overkill levels of water cooling potential + Easy tool free installation and removal of front panel, both side panels, and top panel. Like many modern cases, the top panel prevents the side panels from being removed, and it is secured by just one thumbscrew. Side panels are tool-free, and to remove the front panel you just hold a latch on the bottom and then pull it off. + Ample front connectivity + Best expansion card installation Ive ever come across in 15 years of PC building. In just about every other case Ive used, including various Lian-Li models, theres slight misalignment with the screw holes when installing a graphics card. The HAF 700 omits screws in favor of a big brute force clamp which holds my RTX 4090 just fine. + Tool free PSU installation, easy 2.5 drive installation (and presumably 3.5 in that cage, didnt check), and can hold tons of drives + Vertical GPU support, though I dont use it + Comes with a fantastic PWM fan+ARGB controller. The fan connections are all PWM, each one has an ARGB connector, and it supports 7 or so fans! It connects to a PWM motherboard header and SATA power. This powers all my fans except for my CPU fans. + Despite the size its not heavy because its mostly plastic Cons: - So big but theres nowhere to really grab it by and no casters, so I basically have to waddle it about because I have short t-rex arms - In typical HAF fashion, theres no front dust filter. This is the only source of intake and its unfiltered. I stuck a Demciflex magnetic filter inside the front panel, but there are some gaps. Good enough. - Accessing the bottom dust filter requires removing the left side panel, which requires removing the top panel - Expansion slot covers use tiny flathead screws that require a long skinny screwdriver to reach, which I didnt have in my toolbox. They should have used something more standard here. - Flimsy cable grommet installation - my 24-pin ATX cable pushed one of the rubber grommets clean off and its a pain to get back on, this never happened to me in a case before - Not really a con but you cannot fit Noctua 200mm fans in place of these front 200mm fans. The Noctuas are too thick.
-
R. Wilson
> 3 dayIt is huge, I know you read the reviews and have measured the size, but it is massive! Easy to work on! however there is about 6 to 8 inches of spare space on the side of the motherboard that they could have removed. The depth is intimidating until you start putting radiators beside each other in the top, then you understand. MY EATX motherboard seems to be cowering in the corner. but this was one of the easiest builds I have ever done (Been building PCs since the late 80s & first time without any blood...
-
George Xu
> 3 dayI purchased the H500 for a high-end, air-cooled AMD 5950X + Nvidia 3090 build. The case is just about the right size and offers plenty of options to mount components. The two giant 200mm in-take fans offer a unique look and a lot of airflow. All the mesh components have a magnetic mesh filter that can be easily removed and cleaned. The power supply shroud nicely hides the mess of wires. There are also plenty of tie downs to neatly route wires around the case. Since it is a mesh case, it can get noisy given all the openings for airflow. However, this should be expected as the alternative would be to do a liquid cool system that would not rely on so many fans. When using the Noctua NH-D15 cooler, the case doesnt have enough width to fit the second 140mm cooler fan over the RAM modules. I resorted to using a 120mm fan instead which will offer enough clearance. (So if you are looking at the Noctua NH-D15, get the NH-D15S instead which only comes with 1 fan and you can purchase a 120mm fan separately). I purchased the case during a rebate promotion. The instructions were confusing since it asked for a physical UPC which my box did not have. This was remedied through customer service although I have yet to receive the rebate.
-
Darren R.
> 3 dayMy latest build I wanted to go completely air cooled and when I saw the Cooler Master H500, I knew that I needed it. Putting all my components in and routing the cabling was so much easier than my Corsair case as there is a decent amount of room inside due to the lack of 5.25 inch drive bays. Cable management was great as well and the shroud that goes over the power supply helps hide excess cabling and there are plenty of tie down points. Those big 200mm fans move quite a bit of air and are very quiet. I havent had a chance yet to test the temperature differences but Id venture a guess that its better with the increased airflow. I sit right next to the case and its hard to notice them, the CPU cooler (stock AMD for now, new cooler coming) is noisier than they are. The RGB is pretty bright as well, so if thats your thing, youre covered. Works with Aura Sync, probably would work with others as well. A word of caution: the case is fairly tall, especially in the front where the handle and front I/O is. If youre trying to stuff this monster into a small area.... she wont fit. This case is good looking enough to not want to hide it away. Set that beast on the desk and admire your handywork thru its real glass panel. For the $120 you pay, the case is worth it!