
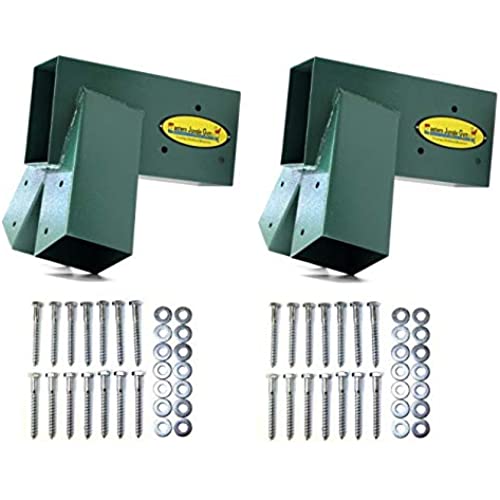

Eastern Jungle Gym Easy 1-2-3 A-Frame 2 Brackets for Swing Set with All Mounting Hardware, Green
-

Kelly
> 3 dayBefore I start my review, you should know a few things. First and foremost I did NOT receive this item for free or at a discount. Second, I am a 34 year old woman who has no experience building anything like a swing set before. I hadnt even used a ratchet before now. I am a biochemist eye disease researcher and mother of a 4 year old boy with autism. My son, like many kids with autism loves to swing. And when I say loves that is a major understatement. His birthday is coming up and I wanted to get him a swing set. We just moved into a new house. Our old house had great trees for swings and this house doesnt. However, nice swing sets are SO EXPENSIVE to buy, so I started looking into the possibility of building one. While I dont have much experience doing anything like this, Im all about trying! Thats when I stumbled upon these brackets and decided I could do it. Im glad I saw the kit version instead of just buying two of the brackets themselves. It saved me a lot of time and trouble buying the right hardware as well. This kit comes with everything you need to assemble the A frame except the wood and tools. I ended up making a basic A frame with a 10 top beam and 10 legs (they recommend 8 legs but I wanted to have a larger swing arc). Heres what I needed to complete the project: - This kit (which comes with two brackets and 28 appropriately sized lag bolts and washers) - One 10 foot 4x6 beam (Home Depot) for the top (be sure to get pressure treated lumber so it will last and wont degrade in contact with the ground) - Four 10 foot 4x4 beams (Home Depot) for the legs (can be anywhere from 8 to 12 feet but I recommend going longer, especially if you plan to anchor the legs in concrete or bury them in the ground. I opted not to bury them but just get some screw in ground anchors. - A drill and drill bit smaller than the lag bolts to pre-drill the holes (already had). I dont know what size exactly I used but it was one that came standard with my drill. - 2 swings. I already had this Deluxe Platform Swing by HearthSong that I bought on Amazon last year and my son loves it. I hung it in our tree using the yellow swing ties that you see pictured - also bought on Amazon. I decided to use them since I already had them. I bought the half bucket swing on Amazon for this project from Swing Set Stuff. - Safe-Kidz heavy duty swing anchor kit (again, Amazon) which came with two anchors, two clips, a drill bit and 4 lag bolts and screws. - Two 80 lengths of zinc chain (Home Depot). I guessed at this amount before building the swing set but only ended up needing about 70 for the half bucket. It all depends on what type of swing youre hanging and the age of the children. - Two Quick Links (Home Depot) to connect the chain ends to the swing - Ratchet and appropriate size bit (again, one that came standard with my ratchet that I already had) With all of this stuff I was able to complete this swing ENTIRELY BY MYSELF in just a couple hours time and that includes the shopping and loading/unloading!! The brackets take all the guess work and careful measuring out of the equation for you. Just slide the wood into the bracket, pre-drill the holes for the lag bolts and ratchet them down and your A frame is finished! A note about inserting the beams into the brackets. Other reviewers mentioned tight squeezes and having to sand or lubricate the beams and then beat them in with a rubber mallet to get them to fit. I was prepared with my orbital sander, dish soap and rubber mallet to do whatever it took but none of that was needed! The beams I bought slid right in with no effort whatsoever. It literally could not have been easier. I guess it depends on where you get your wood, but if its TRULY 4x4 and 4x6 they should slide in to these brackets NO PROBLEM without sanding or lubricating. Before I stood it up (I actually did need help with that part) I measured and installed the mounting hardware for the half bucket swing in the top beam. The manufacturers of the hardware suggest measuring at least 15 away from the nearest structural element of the swing set. I went a little further than that. They also recommend spacing the hardware wider than whatever swing they will be holding. For standard swings 16 should be fine. Thats what I did. Once I stood it up I hung and adjusted the platform swing using my ladder and tested it out myself to be sure it was sturdy. Holy cow this thing isnt going ANYWHERE! Even without being anchored to the ground (which I will do anyway) I was able to swing pretty high laying on the platform without the A frame even wiggling a tiny bit under my 130lb weight! When my husband and son got home from their daddy day that afternoon they were both blown away that I had done it myself and my boy was ECSTATIC!! He LOVES his new swing set and I love how easy it was and that it saved me money! So heres the final price tag on the one I built if it helps: Wood - $100 Bracket/hardware kit - $79 Half bucket swing - $40 Chain - $30 Swing mounting hardware - $28 I already had the platform swing and swing ties but they were $130 and $25 respectively That was only $277 out of pocket and a few hours on a Saturday morning for me which is basically amazing. Total cost including the stuff I already had would put it at $432. For a swing set of this height and sturdiness you would be hard pressed to find something cheaper. Also, this would be very easy to add on to! I intend to add wood planks to the side of the A frame and build a climbing wall on one side and add a slide to the other! Plus Im so proud of myself that I did this. I love sticking it to gender roles! Im telling you, if I could do this, anyone could do this! I have nothing but the highest praise for these brackets and highly recommend them to anyone who thinks swing sets are too expensive or is contemplating building their own! One more free tip for you newbies like me: When working with pressure treated lumber, WEAR GLOVES!!!! Splinters from pressure treated wood are NASTY and will get infected really quickly so save yourself the pain and trouble and just wear gloves from the start. I really hope this helps someone else! Good luck and have fun building!
-
sarah harte
> 3 dayAdded this to our large solar array for some outside fun. Used Home depot Prowood pressure treated lumber. Went with a 12 foot 4x6 that is attached to an existing 6x6 and the other end is supported by 12 ft 4x4s buried into the ground about a foot. The top beam extends about 32 inches through the a frame bracket for the trapeze. The swings are a little tight with the two swings and I should have went with a 16 ft top beam. The bracket slid right onto the wood with no issues. I was expecting to have to plane the wood a bit based on reviews but that was not needed. Took maybe an hour to assemble and dig my holes to get it level. Seems to support my 200 lbs at full speed swinging no problem. The 6x6 is anchored in several hundred lbs of concrete though. You probably want anchors if you are building a free-standing frame.
-
Valerie U
08-04-2025There are no instructions provided but its easy enough to figure out. Be sure to buy pressure-treated ground contact wood for 1) the swing set to last and 2) to keep the carpenter bees away. Also, its easier to stain the wood with a quality outdoor stain or sealer before you assemble it.
-
Joshua
> 3 daySuper sturdy and great coating. I definitely recommend bringing them to store when you are purchasing the wood. Wood is not all cut correctly every time so bring the bracket to confirm the wood you select fits into holes
-
Brian H.
> 3 dayAs many other reviewers have noted, these brackets are very tight fitting on a 4”x6” cross beam. I took the brackets with me to a wood yard and I recommend you do the same. The yard I went to had a new bundle of 12’ 4”x6”s. I sorted through about 10 before I found 2 that the brackets would slip over both ends tightly. The other 4”x6”s would have had to be planed down 1/8”-1/4” to get the brackets to fit. The beams from the yard I was purchasing from were ‘Yellow Wood’, so that shows you what variations in dimensions you could get from a random 4”x6” from the supply store. The brackets have all of the hardware needed to affix to posts and cross beams. There were no issues with any 4”x4” posts fitting. Even though I made sure the brackets would slide over the ends of the 4”x6” cross beams, I still had to use a block of wood and hammer to get them to slide all the way on. I drove them all the way flush to the ends of the beam. If you wanted a 3’-4’ overhang, it would be difficult to get the brackets to slide that far without planing down your cross beam. I made a 24’ swing, so I used these brackets on both ends and a middle support bracket to join the 12’ Cross beams. The middle support bracket seemed to be a little larger than these brackets and went on both ends of the cross beams with relative ease. I installed hardware to hang 3 swings on each 12’ Beam. This allowed for 22” from cross beam end to the first swing and 20” center to center for each swing hanger and 20” between each swing. This is very spacious for my girls (10 and 7) and the 20” spacing also allows ample room for adults to swing. You could certainly fit 4 swings on a 12’ Beam if you needed too. With the 4”x4” posts angled out on the end brackets, you could get by with starting your first swing hanger at around 14” from the end of the beam and be fine. I used 12’ 4”x4” posts to allow the girls to swing higher. I also used a 2”x6” brace on each set of 4”x4” posts. I did not trim the ends of the posts where they join the dirt and I have not anchored my swing set. I tested it out by swinging as high as I could and this set does not move at all. I may bury 4 posts on each end of the swing set and screw the ends of the 4”x4”s too just to be safe as the girls get older and wilder. I attempted to stain and waterproof my wood before putting it up, but it was just too green to hold the stain. I’ll come back and do that in a couple of months. I did have the luxury of using a front end loader to hold the cross beam in the air while I stood the 4”x4” posts up and into the brackets. Most slid right in and tight. If they didn’t, I got on ladder and rocked the cross beam while pulling down and they easily slid the rest of the way down on the 4”x4” posts.
-
Dave Fraq
> 3 dayWent together easy and really sturdy.
-
jaw
13-04-2025I checked the dimensions of a 4x6 at both big box stores and they were all a hair too tall. Width was perfect. I took a skill saw and cut about 1/8” off the TOP of the 4x6 and was able to hammer the bracket on. The 4x4 legs fit with no modification, but was actually a little loose. If the manufacturer would make the bracket fit common available lumber it would go together without many tools. If you’re a competent DIY’er it’s no problem. You will need a friend to stand this up and move it around once assembled.
-
NOAMattD
> 3 dayUsed these in combination with a middle bracket to make a 16 A-frame swingset. Pros: + Durable paint and steel, holding up perfectly after a few months in the elements + Included GALVANIZED hardware - important! + Snug fit - I see a lot of people complain about it being a tight fit for a standard big box 4x6. I see that as a good thing because I know its not going anywhere. About 15 minutes with a hammer and chisel and youll be good to go, but Id also recommend letting your pressure treated wood dry out for a week or two beforehand to make it easier. Cons: - As others have said, regular 4x4s fit a little loose in the leg holes. I didnt use shims or anything, but I wish they fit a bit more snug. - Lack of documentation: A little time with an angle finder and some experimenting and I found that a 15 degree bevel and 15 degree miter will get your legs to sit more or less flat on grass. It would have been helpful if the angles for the legs were provided by the vendor. All in all Im happy with the brackets; for less than the price of a premade swingset we got to build our own custom one.
-
jay
Greater than one weekThis product works decent enough, however you may want to put in some additional support that I showed in the picture. After two years, the entire swingset moves away more than I feel comfortable with; so you can go by the hardware store and pick up some steel conduit piping, Cut into 2 foot lengths, hammer each end flat and drill a hole. Then mount them as a hypotenuse to the corners and it will stiffen up the entire swingset and make it way more safe
-
Christopher walker
Greater than one weekThe bracket is tight on the 4x6 beam. It’s best to use a rasp to file down the wood before driving it onto the beam. The 4x4 post fit easy.


